Help Requests
Help Requests are Aptli's built-in issue and support tracking system. Any user can raise a help request directly from a record's detail page — the request is automatically attached to that record, so there's never any ambiguity about what it's about. Admins manage the queue from the Admin panel.
Who Uses Help Requests
| Role | What they do |
|---|---|
| Any user | Opens the help panel from a record's detail page to submit a request about that record |
| Admin | Reviews the queue, updates status, and resolves requests |
Submitting a Help Request (from any record)
Every record's detail page (/[entity]/[id]) has an Ask for help button in the header — look for the badge-help icon. This includes projects, reports, tasks, work orders, validations, sites, resources, and stock items.
Steps:
- Open any record's detail page (e.g. a task, work order, or user profile)
- Click Ask for help in the page header
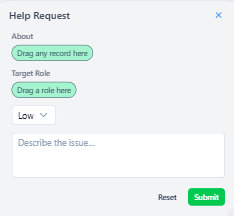
- A right-side slideover opens — the record is already attached as the target (shown as a read-only chip in the About field)
- Fill in the fields:
- Title (required) — a short, clear description of the problem
- Description — steps to reproduce or additional context
- Target Role — which team should handle this (searchable dropdown; optional — leave blank for any admin)
- Urgency — Low / Medium / High / Critical
- Attachments — optional photos or files
- Notify target role — optional checkbox to immediately email the target role
- Click Submit
The context URL is captured silently so admins can jump straight back to the page you were on.
No Overlay — Keep Working While You Write
The help panel opens as a right-side slideover without a modal overlay, so you can still scroll, read, and copy text from the record behind while writing your description. Close the panel and your edits to the record are untouched.
Related Help Requests Badge
Every record that accepts help requests shows an aggregate help request badge next to the Ask for help button. The badge summarises open requests against that specific record at a glance.
- Grey / zero — no related requests
- Coloured / count — one or more requests; hover for a status breakdown
Clicking the badge jumps to the filtered list view, scoped to that record.
Share a Record in a Request
Each detail page also has a Share button that copies a shortlink (e.g. /help/:id) to the clipboard. Paste it anywhere — Slack, email, or the description of another help request — and it resolves back to the exact record for whoever opens it.
Urgency Levels
| Level | When to use |
|---|---|
| Low | Nice-to-have, no time pressure |
| Medium | Affects workflow but has a workaround |
| High | Blocking productive work |
| Critical | Causing data loss or system unavailability |
Legacy requests stored as numeric urgencies are automatically mapped to the new labels on read — no migration needed.
Admin: Managing the Queue
Navigate to Admin → Help Requests (/admin/help-requests) to view all submitted requests.
Filtering
- Use the filter bar at the top to search by title or description
- Use the status filter — defaults to Open so admins see actionable work first. Other options: Committed, Deferred, Failed, Resolved
- Toggle Show Deleted in the top-right to view archived requests
- Use My requests (link at the top of the panel) to see only requests you personally submitted
Viewing a Request
Click the expand arrow on any row to open the full request detail, including:
- Requestor email and submission date
- Attached record (the target — rendered as a link)
- Context URL (the page the user was on when submitting)
- Description and attachments
- Assigned target role
- Current status and urgency
Updating a Request
Inside the expanded view, admins can:
- Change the status (see lifecycle below)
- Reassign the target role
- Adjust urgency if the initial assessment was off
- Record a resolution note, resolved by, and resolved at (auto-filled when you mark Resolved)
Save changes using the Submit Changes button (cloud-upload icon, top right). Changes take effect immediately.
Request Lifecycle
open → committed (work started)
     → deferred  (acknowledged, not yet scheduled)
     → failed    (could not be resolved)
     → resolved  (complete — captures resolvedAt/resolvedBy/resolutionNote)
| Status | Meaning |
|---|---|
| Open | Newly submitted, not yet reviewed |
| Committed | Admin has accepted and begun work |
| Deferred | Logged but not currently actionable |
| Failed | Resolution was attempted but unsuccessful |
| Resolved | Complete — resolution note, resolved-by, and resolved-at are captured |
Resolving a Request
Click Resolve in the expanded view to open the Resolve modal. Enter a resolution note summarising what was done, then confirm — the request moves to resolved, stamped with your user and timestamp. The requestor sees the resolution note when they revisit the request.
Bulk Actions
Select multiple rows using the checkboxes to:
- Bulk delete or bulk restore requests
- Bulk update shared properties using the settings (gear) button in the floating toolbar
Security — Requestor is Server-Enforced
The requestor on a help request is forced from the session on the server. A user cannot spoof another user's requestor on submit. Admin edits don't change the original requestor.
Tips
- Open the panel from the actual record — the attached target means the admin never has to ask "what record is this about?"
- Be specific in the title. "Map won't load on site S-42" is more actionable than "Map problem."
- Use Target Role when you know which team handles this type of issue — it helps admins triage faster
- Critical requests should also be communicated directly (phone, message) — the in-app queue is not a real-time alert system
- Notify target role is useful for urgent issues where you want the admin team paged immediately
- Resolved requests stay in the system — filter by Resolved (or Show Deleted) to review historical resolutions